Easy Homeschool Organization Ideas & Tips
Brilliant Homeschool Organization Ideas & Tips are an absolute game-changer for families navigating the beautiful chaos of learning at home! Does your kitchen table constantly morph into a science lab or an art studio, only to be buried under a mountain of worksheets and textbooks by dinnertime? I totally get it! My own home used to feel like a perpetual school supply explosion. But imagine this: a serene learning space where everything has its place, making it easy to find what you need, and even easier to tidy up. The best part? You can achieve this transformation in a weekend, often with budget-friendly solutions that cost less than a fancy coffee run. In this article, I’ll share my go-to strategies and clever hacks to create a functional, inspiring homeschool environment. You’ll learn how to declutter effectively, implement smart storage solutions, and establish routines that keep your learning space (and your sanity!) in check.
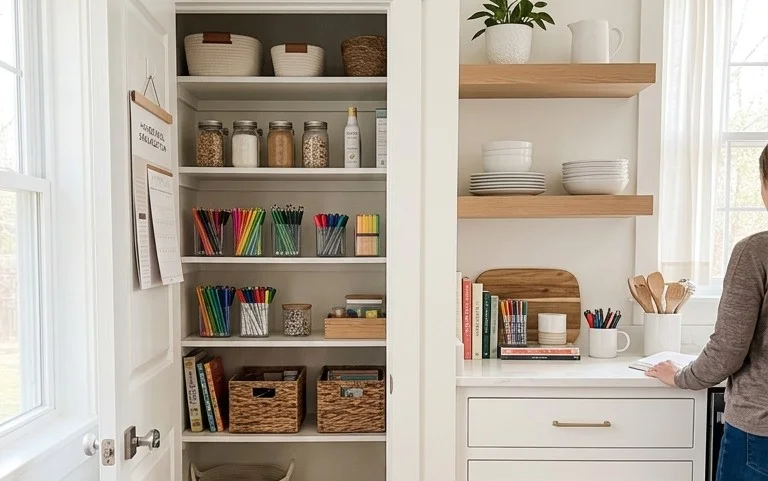
Brilliant Homeschool Organization Ideas & Tips
As a homeschooling parent, I know firsthand the unique organizational challenges that come with transforming your home into a dynamic learning environment. It’s not just about finding a quiet corner; it’s about creating accessible, engaging, and functional spaces that support your children’s learning journey. The good news? It doesn’t have to be overwhelming or break the bank. With a little thoughtful planning and some clever strategies, you can craft a homeschool haven that’s both beautiful and brilliantly organized.
What You Need & Roughly What It Costs
Before we dive into the nitty-gritty, let’s talk about what you might need and the investment involved. The beauty of homeschool organization is its adaptability. You can start small and scale up.
* **Storage Solutions:** This is the big one. Think bookshelves (Ikea’s Kallax units are fantastic, around $100-$200 depending on size), cube organizers ($50-$150), wall-mounted shelves ($30-$100), storage bins and baskets (canvas, plastic, or woven – budget $5-$20 per bin), drawer units (small desktop ones from $20, larger ones $50-$150), and file boxes ($5-$15 each).
* **Labeling Supplies:** A good label maker is a game-changer (around $40-$80). Alternatively, you can buy sticker labels ($5-$10) or even just use a nice pen and cardstock tags ($3-$5).
* **Desk Supplies:** Consider a good quality desk ($100-$300, but you can often find great second-hand options). Don’t forget desk organizers like pen holders, tray sorters, and small drawers ($15-$40).
* **Visual Aids:** Whiteboards or chalkboards (small ones $20-$50, larger ones $100-$200), corkboards ($15-$40), and magnetic strips ($10-$20).
* **Comfort and Functionality:** Comfortable seating is crucial. This could be a dedicated desk chair ($75-$200) or even just a comfy floor cushion. Add good lighting – a desk lamp can be $20-$50.
* **Art and Craft Supplies Storage:** Often requires specialized containers like craft caddies ($15-$30), paint caddy organizers ($10-$20), and possibly a rolling cart ($50-$150) if you have a lot of supplies.
**Rough Budgeting:** For a moderate setup, I’d suggest budgeting between $300-$800 to get started. This can be spread out over time, and many items can be found at discount stores, thrift shops, or online marketplaces for a fraction of the price.
How to Measure and Plan Before You Start
This is the most crucial step, and one many of us skip in our eagerness to get organized! Don’t skip it.
1. **Assess Your Space:** Where will learning primarily take place? Is it a dedicated homeschool room, a corner of the living room, or a shared family space? Measure the dimensions of the area you intend to use. If it’s a corner, measure its width and depth. If it’s a whole room, measure the walls and floor space.
2. **Identify Your Needs:** What subjects are you teaching? What materials do you use most frequently? Think about books, workbooks, art supplies, science experiment kits, manipulatives, technology, and any special resources. Consider the age and number of your children.
3. **Inventory Your Current Supplies:** Gather all your homeschool materials in one place. This is often eye-opening! Sort them into categories (math, reading, science, art, stationery, etc.).
4. **Visualize the Flow:** How do you want the space to feel and function? Do you need a large central work surface? Do you want distinct zones for different subjects? Do you need a quiet reading nook?
5. **Sketch It Out:** Grab some paper and a pencil and draw a rough floor plan of your space. Then, start sketching in furniture and storage solutions. Don’t worry about perfection; this is just to get your ideas down. For example, if you have a 10ft x 12ft room, you might see that a 4ft wide bookshelf can fit against one wall without overpowering the space.
A Clear Numbered Walkthrough of the Process
Once you have a plan, it’s time to bring it to life.
1. **Declutter Ruthlessly:** Before you buy anything, go through your inventoried supplies. Donate or discard anything that is broken, outdated, or no longer used. Be honest with yourself! This is the most effective way to reduce the amount of storage you actually need.
2. **Choose Your Core Storage:** Based on your measurements and needs, select your main storage pieces. For a general homeschool room, a few sturdy bookshelves (like two 3ft wide, 5-shelf units, costing around $150 each) and a good desk ($150-$250) are excellent starting points.
3. **Implement Vertical Storage:** Utilize wall space! Install floating shelves (approx. $50-$100 for a set of 3) above your desk or in unused corners. This keeps surfaces clear and materials accessible.
4. **Categorize and Contain:** Group similar items together. Use bins and baskets to hold these categories. For instance, all math manipulatives in one large bin ($15), reading comprehension workbooks in a smaller bin ($8), and art supplies in a divided caddy ($25). Label EVERYTHING clearly.
5. **Designate Zones:** Assign specific areas for different activities. A desk area for focused work, a comfy corner with cushions for reading, and a clear space for hands-on projects. If you have a smaller space, you can create these zones through clever furniture placement and rugs.
6. **Set Up a Visual Board:** Mount a whiteboard or corkboard ($40-$100) where you can display schedules, assignments, important dates, or inspirational quotes. This makes information readily visible and accessible.
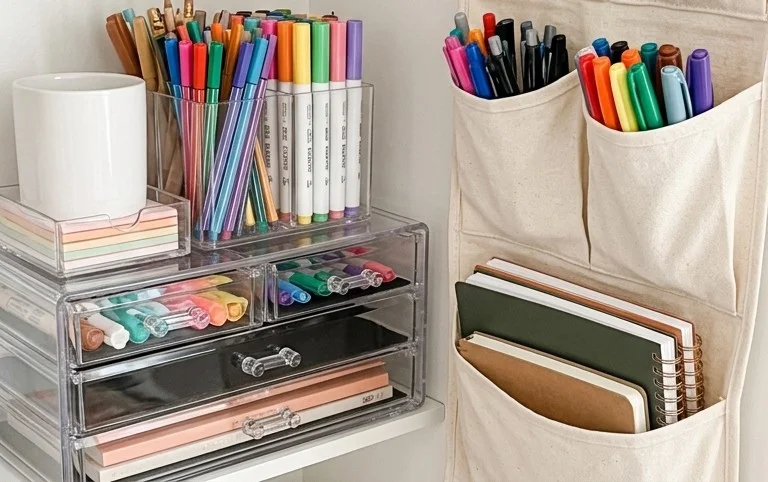
7. **Organize Your Desk:** Use drawer organizers and tray sorters ($20-$40) to keep your personal workspace tidy. Keep frequently used items within easy reach.
8. **Children’s Access:** Ensure that your children can easily access the materials they need for independent work. If they can reach it and put it away, they’re more likely to use it responsibly.
How to Adapt it for a Small Space or a Rental Where You Cannot Drill
Don’t despair if you’re working with limited square footage or can’t make permanent changes!
* **Embrace Verticality (Without Drilling):** Look for tall, slender shelving units that require no wall mounting. Freestanding cube organizers are perfect. Consider rolling carts that can be moved and stored when not in use. Tension rod shelves can also be used in closets or between cabinets.
* **Think Multi-Functional:** Invest in furniture that serves multiple purposes. A storage ottoman can be extra seating and a place to hide books. A fold-down desk can be tucked away when not needed.
* **Utilize Door Space:** Over-the-door organizers are fantastic for storing smaller items like stationery, flashcards, or even books. You can find fabric ones with multiple pockets for about $20-$30.
* **Command Strips are Your Friend:** For hanging lightweight items like calendars, small corkboards, or even picture frames, strong adhesive strips like Command strips are a lifesaver. They hold well and remove cleanly ($10-$20 per pack).
* **Stackable Solutions:** Opt for stackable bins and drawers. This maximizes vertical space within existing furniture or on tabletops.
* **Mobile Learning Stations:** Create a “learning cart” using a rolling utility cart ($50-$150). Load it with materials for a specific subject or week. When it’s time for that lesson, simply wheel it to where you’re learning. When you’re done, wheel it back to a corner and tuck it away.
Styling Notes: Colour, Texture, and Placement
Organization doesn’t have to mean sterile. Here’s how to make it beautiful and functional:
* **Colour Palette:** Stick to a calming, cohesive colour palette. Neutrals like whites, greys, and natural wood tones create a serene backdrop. You can then add pops of colour through bins, cushions, or artwork. For example, if your shelves are white, use a mix of teal, mustard yellow, and light grey bins.
* **Texture Variety:** Mix textures to add visual interest. Woven baskets ($10-$25 each) bring warmth and softness. Smooth plastic bins offer durability. A plush rug ($50-$150) can define a learning zone and add comfort.
* **What Goes Where:**
* **High Shelves:** Store less frequently used items or materials for older children here.
* **Eye Level:** This is prime real estate for current textbooks, workbooks, and frequently accessed resources for all children.
* **Lower Shelves/Bins:** Perfect for younger children’s books, manipulatives, or art supplies they can access independently.
* **Desk Top:** Keep only essentials – a lamp, a pen holder, a small tray for current assignments, and maybe a small plant.
* **Baskets:** Ideal for bulky items like blankets for a reading nook, loose papers, or larger collections of smaller items.
How to Keep it Tidy After Week One
The initial organization is often the easy part. Maintaining it is where the magic happens.
1. **The “Ten-Minute Tidy”:** Implement a short, daily tidying session, ideally at the end of the homeschool day. Everyone participates. This involves putting books back on shelves, returning supplies to their designated bins, and clearing the desk.
2. **Regular Purge Sessions:** Schedule a brief decluttering session every 4-6 weeks. This prevents clutter from creeping back in.
3. **”One In, One Out” Rule:** For new books or supplies, encourage the rule: for every new item that comes in, an old one goes out (donated or recycled).
4. **Involve the Kids:** Teach your children the importance of organization and give them ownership of their spaces. Let them help decide where things should go and how they should be stored.
5. **Weekly Review:** Spend 15-20 minutes each Friday afternoon reviewing the week’s materials. Put away finished work, file important papers, and restock any depleted supplies.
Mistakes That Make This Fail
Even with the best intentions, a few common pitfalls can derail your homeschool organization efforts.
* **Over-Purchasing Storage:** Buying too many bins and shelves before you’ve decluttered is a classic mistake. You end up with more storage than you need and less motivation to fill it properly.
* **Lack of Clear Labeling:** If items aren’t clearly labeled, they’ll end up in the wrong place. This leads to frustration and disorganization.
* **Not Involving the Children:** If you’re the only one doing the organizing and tidying, it’s unlikely to stick. Children need to be active participants.
* **Too Many “Homes”:** Every item should have a designated home. If things don’t have a clear place to go, they’ll end up scattered.
* **Unrealistic Expectations:** Don’t aim for Pinterest-perfect from day one. Progress, not perfection, is the goal. Some days will be tidier than others.
* **Not Adapting:** What works today might not work next year. Be prepared to reassess and adjust your organization system as your children’s needs and learning styles evolve.
Creating an organized homeschool environment is an ongoing process, but it’s one that pays dividends in reduced stress, increased efficiency, and a more enjoyable learning experience for everyone. Happy organizing!
Conclusion
Implementing Brilliant Homeschool Organization Ideas & Tips truly transforms the daily rhythm of your learning space. Imagine mornings free from frantic searching, afternoons filled with focused activity, and evenings spent relaxing instead of tidying. The peace and efficiency gained are immeasurable, creating a more joyful and productive environment for everyone.
Ready to start? Your smallest first step today could be as simple as clearing one shelf in your homeschool area. This small victory builds momentum!
Variation 1: Kitchen Command Center For a high-traffic area, consider a wall-mounted organizer for mail, keys, and a family calendar. Variation 2: Budget-Friendly Bookshelf Tidy Utilize colorful bins or even repurposed boxes to group books and supplies, making them easily accessible and visually appealing without a large expense.
Don’t stop here! We’re brimming with more brilliant ideas and practical solutions to elevate your homeschool and make every corner of your home work for you. Explore further to discover your next organizational win!
